DIY Arduino Radar Project
Learn how to build a simple radar system using an Arduino, ultrasonic sensor, and a servo motor.
Step 1: Gather Components
- Arduino Uno
- Ultrasonic Sensor (HC-SR04)
- Servo Motor
- Jumper Wires
- Breadboard
- Potentiometer (Optional, for adjusting sensitivity)
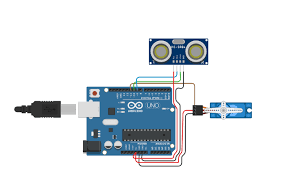
Step 2: Wiring the Components
Connect the ultrasonic sensor and servo motor to the Arduino as follows:
- Ultrasonic Sensor VCC to Arduino 5V, GND to GND, Trig to Digital Pin X, Echo to Digital Pin Y.
- Servo Motor VCC to Arduino 5V, GND to GND, Signal to Digital Pin Z.
- (Optional) Potentiometer VCC to 5V, GND to GND, Wiper to Analog Pin A0.

Step 3: Arduino Code
          #include <Servo.h>
          Servo servoMotor;
          const int trigPin = X;
          const int echoPin = Y;
          const int servoPin = Z; // Define the servo signal pin
          const int potPin = A0;   // Optional potentiometer pin

          void setup() {
            servoMotor.attach(servoPin);
            pinMode(trigPin, OUTPUT);
            pinMode(echoPin, INPUT);
            Serial.begin(9600);
          }

          void loop() {
            int angle;
            if (analogRead(potPin) > 512) { // Optional: control angle with potentiometer
              angle = map(analogRead(potPin), 513, 1023, 0, 180);
            } else {
              angle = map(analogRead(potPin), 0, 511, 180, 0);
            }

            servoMotor.write(angle);
            delay(15); // Small delay for smooth movement
            long duration = measureDistance();
            int distance = duration * 0.034 / 2;
            Serial.print("Angle: ");
            Serial.print(angle);
            Serial.print(", Distance: ");
            Serial.print(distance);
            Serial.println(" cm");
            delay(100);
          }

          long measureDistance() {
            digitalWrite(trigPin, LOW);
            delayMicroseconds(2);
            digitalWrite(trigPin, HIGH);
            delayMicroseconds(10);
            digitalWrite(trigPin, LOW);
            return pulseIn(echoPin, HIGH);
          }
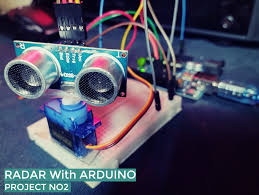
Step 4: Assembly and Testing
Mount the ultrasonic sensor on the servo motor. Upload the code to the Arduino and test the radar's functionality.